Certificate Authority
TRISA is unique amongst open source Travel Rule protocols in that it is a trusted network, meaning that all communications are protected. TRISA uses mTLS (mutual transport layer security) to protect communications between peers. In addition to helping protect against malicious API requests, mTLS can prevent spoofing and phishing, as well as brute force and on-path attacks.
mTLS requires that both peers in an interaction have Identity Certificates with a mutually-recognized root Certificate Authority (CA). This root CA is necessary to enhance trust and ensure that private client data is being sent to the correct party.
Imagine two VASPs that wish to exchange Travel Rule data, Alice and Bob. When Alice registers for TRISA, it receives Identity Certificates, which serve as proof to Bob that Alice is who it says it is, and vice versa:
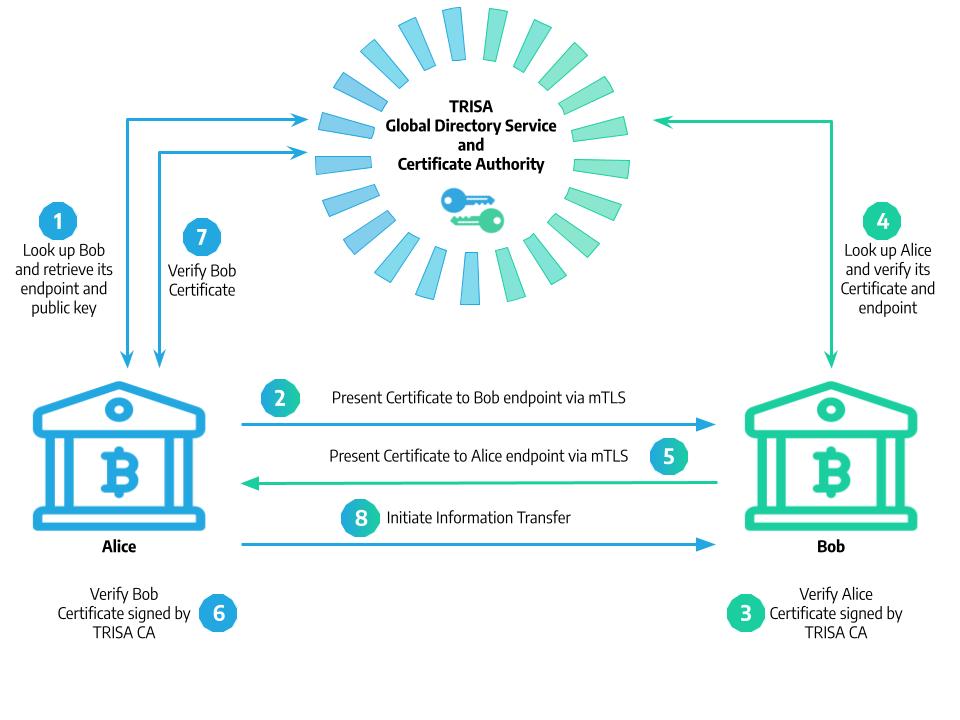
- First, Alice looks Bob up in the Global Directory Serice to retrieve its endpoint and public key.
- Alice then presents it’s own Identity Certificates to Bob’s endpoint via an mTLS connection.
- Bob can then verify that Alice’s certs are signed by the TRISA root Certificate Authority.
- Bob looks up Alice and verifies its certificates and endpoint details in the Global Directory Service.
- Bob presents it’s Identity Certificates to Alice’s endpoint via mTLS.
- Alice can then verify that Bob’s certs are signed by the TRISA root Certificate Authority.
- Alice confirms that Bob’s certificate details match those in the Global Directory Service.
- Now that both parties are satisfied that they can trust each other with private customer data, they proceed with a Travel Rule information exchange.
The Sectigo CA API
Warning
This portion of the documentation is targeted at TRISA developers rather than TRISA implementers. For the most part, the mechanics of certificate issuance will be fully abstracted away from TRISA implementers, who are encouraged to register for certificates using trisa.directory.
The TRISA Directory Service currently issues certificates using the Sectigo Certificate Authority via its IoT Portal. Because the directory service must collect public key material in order to facilitate an initial trusted handshake for mTLS, it uses the Sectigo IoT Manager API as part of the VASP registration and verification process. The github.com/trisacrypto/directory/pkg/sectigo package is a Go library for interacting with the API, implementing the endpoints and methods required by the directory service. The TestNet also provides a command line utility for interacting with the API for administrative and debugging purposes.
This documentation describes the command line utility, which also gives an overview of how to use the API directly to issue and revoke certificates.
Reference material:
Getting Started
To install the sectigo CLI utility, either download a pre-compiled binary from the releases on GitHub or install locally using:
$ go get github.com/trisacrypto/directory/cmd/sectigoThis will add the sectigo command to your $PATH.
Authentication
The first step is authentication, you should set your username and password in the $SECTIGO_USERNAME and $SECTIGO_PASSWORD environment variables (alternatively you can pass them as parameters on the command line). To verify your authentication status you can use:
$ sectigo authThe API authenticates by username and password then returns acess and refresh tokens which are stored in a local cache file. To see where your cache is stored:
$ sectigo auth --cacheIf you’d like to check your credentials state, e.g. if the access tokens are valid, refreshable, or expired, use:
$ sectigo auth --debugAuthorities and Profiles
To begin to interact with certificates you need to list the authorities and profiles that your user account has access to.
$ sectigo authorities
[
  {
    "id": 1,
    "ecosystemId": 100,
    "signerCertificateId": 0,
    "ecosystemName": "TRISA",
    "balance": 10,
    "enabled": true,
    "profileId": 42,
    "profileName": "TRISA Profile"
  }
]
The authority displays the methods and profiles that certificates are created under. Here the profileId field is very important for use in subsequent calls. You can also view how many licenses have been ordered/issued across all authorities as follows:
$ sectigo licenses
{
  "ordered": 2,
  "issued": 2
}
To get detail information for a profile, use the profile ID with the following command:
$ sectigo profiles -i 42This will return the raw profile configuration. Before creating certificates with the authority, you’ll need to know the required profile parameters:
$ sectigo profile -i 42 --paramsCreating Certificates
You can request a certificate to be created with the commonName and pkcs12Password params as follows (note for profiles that require other params, you’ll have to use the code base directly and implement your own method):
$ sectigo create -a 42 -d example.com -p secrtpasswrd -b "example.com certs"
{
  "batchId": 24,
  "orderNumber": 1024,
  "creationDate": "2020-12-10T16:35:32.805+0000",
  "profile": "TRISA Profile",
  "size": 1,
  "status": "CREATED",
  "active": false,
  "batchName": "example.com certs",
  "rejectReason": "",
  "generatorParametersValues": null,
  "userId": 10,
  "downloadable": true,
  "rejectable": true
}
The -a flag specifies the authority, but should be a profile id. The domain must be a valid domain. If you don’t specify a password, one is generated for you and printed on the CLI before exit. The -b flag gives a human readable name for the batch creation. The return data shows detail about the batch certificate job that was created; you can fetch the data to keep checking on the status as follows:
$ sectigo batches -i 24You can also get processing information for the batch:
$ sectigo batches -i 24 --statusOnce the batch is created, it’s time to download the certificates in a ZIP file:
$ sectigo download -i 24 -o certs/This will download the batch file (usually batchId.zip, 24.zip in this case) to the certs/ directory. Unzip the certs then decrypt the .pem file as follows:
$ unzip certs/24.zip
$ openssl pkcs12 -in certs/example.com.p12 -out certs/example.com.pem -nodes
For more on working with the PKCS12 file, see Export Certificates and Private Key from a PKCS#12 File with OpenSSL.
Uploading a CSR
An alternative to certificate creation is to upload a certificate signing request (CSR). This mechanism is often preferable because it means that no private key material has to be transmitted accross the network and the private key can remain on secure hardware.
To generate a CSR using openssl on the command line, first create a configuration file named trisa.conf in your current working directory, replacing example.com with the domain you plan to host your TRISA endpoint on:
[req]
distinguished_name = dn_req
req_extensions = v3ext_req
prompt = no
default_bits = 4096
[dn_req]
CN = example.com
O = [Organization]
L = [City]
ST = [State or Province (fully spelled out, no abbreviations)]
C = [2 digit country code]
[v3ext_req]
basicConstraints = CA:FALSE
keyUsage = digitalSignature, keyEncipherment, nonRepudiation
extendedKeyUsage = clientAuth, serverAuth
subjectAltName = @alt_names
[alt_names]
DNS.1 = example.com
Please carefully fill out the configuration for your certificate, this information must be correct and cannot be changed without reissuing the certificate. Also make sure that there are no spaces after the entries in the configuration!
Then run the following command, replacing example.com with the domain name you will be using as your TRISA endpoint:
$ openssl req -new -newkey rsa:4096 -nodes -sha384 -config trisa.conf \
  -keyout example.com.key -out example.com.csr
You can then upload the CSR using the CLI program as follows:
$ sectigo upload -p 42 <common_name>.csr
{
  "batchId": 24,
  "orderNumber": 1024,
  "creationDate": "2020-12-10T16:35:32.805+0000",
  "profile": "TRISA Profile",
  "size": 1,
  "status": "CREATED",
  "active": false,
  "batchName": "example.com certs",
  "rejectReason": "",
  "generatorParametersValues": null,
  "userId": 10,
  "downloadable": true,
  "rejectable": true
}
The -p flag specifies the profile to use the CSR batch request with and must be a valid profileId. The uploaded CSRs can be a single text file with multiple CSRs in PEM form using standard BEGIN/END separators.
Managing Certificates
You can search for a certificate by name or serial number, but mostly commonly you search by the domain or common name to get the serial number:
$ sectigo find -n example.comOnce you’ve obtained the serial number you can revoke the certificate as follows:
$ sectigo revoke -p 42 -r "cessation of operation" -s 12345This command expects the profile id that issued the certificate with the -p flag, an RFC 5280 reason code passed via the -r flag (unspecified by default), and the serial number of the certificate using the -s flag. If this command doesn’t error, then the certificate has been successfully revoked.
The RFC 5280 reasons are:
- “unspecified”
- “keycompromise”
- “ca compromise”
- “affiliation changed”
- “superseded”
- “cessation of operation”
- “certificate hold”
- “remove from crl”
- “privilege withdrawn”
- “aa compromise”
Note that the reason is whitespace and case insensitive.